
Table of Contents
- Why Transforming Kitchen Cabinets Without a Full Remodel Makes Sense
- Kitchen Cabinet Refacing Cost vs Replacement: Which Is Worth It?
- DIY Kitchen Cabinet Painting Tips That Actually Last
- How to Install Cabinet Vinyl Wrap for a Budget-Friendly Makeover
- Best Cabinet Hardware for Modern Kitchens
- More Ways of Transforming Kitchen Cabinets Without a Full Remodel
- Conclusion
Last Updated: May 14, 2026
Your kitchen is overdue for a refresh, but a full remodel is off the table. Transforming kitchen cabinets without full remodel work is one of the smartest moves a homeowner can make, and Denver Cabinet Painting Colorado has helped hundreds of Colorado homeowners do exactly that. The results are dramatic, the costs are a fraction of replacement, and the disruption is minimal. Below, we’ll show you exactly which methods deliver the best return, what they actually cost, and where most DIYers go wrong.
Cabinet updates are one of the highest-value home improvements you can make, largely because cabinets dominate the visual footprint of any kitchen. According to Remodeling Magazine’s Cost vs. Value Report, minor kitchen remodels consistently rank among the top ROI-generating renovations for resale. The good news is that most of the value comes from the cabinet surfaces themselves, not the boxes behind them.
Here’s what most guides get wrong: they treat all cabinet update methods as roughly equivalent. They’re not. Painting, refacing, vinyl wrapping, and hardware swaps each have different durability profiles, cost ceilings, and skill requirements. The 5 core strategies covered below have transformed kitchens across Colorado without a single cabinet box being replaced.
Why Transforming Kitchen Cabinets Without a Full Remodel Makes Sense
Replacing kitchen cabinets is one of the most expensive home improvement decisions you can make. A full cabinet replacement project can run deep into five figures once you factor in demolition, new boxes, installation, and finishing. Transforming kitchen cabinets without full remodel work sidesteps all of that cost while still delivering a dramatic aesthetic upgrade.
The core insight here is structural: most builder-grade cabinets are built to last decades. The boxes themselves are rarely the problem. What ages poorly is the finish, the hardware, and the door style. All three are replaceable without touching the underlying structure.
Cabinet updates also offer something a full remodel can’t: speed. A professional painting or refacing job can be completed in days, not weeks. There’s no extended period without a functional kitchen, no contractor scheduling chaos, and no unexpected structural surprises behind old drywall.
Cabinet boxes rarely fail. Surfaces, hardware, and door styles are what make kitchens look outdated, and all three can be changed without replacement.
For homeowners focused on home value, cabinet transformations make particular sense before a sale. Buyers respond to fresh, modern finishes. A kitchen makeover that modernizes outdated cabinet faces and upgrades hardware can shift buyer perception significantly without requiring a full renovation budget.
Kitchen Cabinet Refacing Cost vs Replacement: Which Is Worth It?
Cabinet refacing is the process of applying new veneer or laminate to existing cabinet boxes while replacing the doors and drawer fronts. Cabinet replacement involves removing everything and starting from scratch. For most homeowners, refacing wins on cost, speed, and practicality, but the decision depends on the condition of your existing boxes and the scope of the layout change you want. This section gives you the granular cost breakdown that most guides skip entirely.

Step-by-Step Cost Breakdown for Refacing vs Replacing
The table below reflects general market ranges reported by contractors and aggregated cost platforms. Treat these as planning benchmarks, not quotes, labor markets vary significantly by region, and Colorado’s Front Range tends to run 10-20% above national midpoints for skilled trades.
| Cost Component | DIY Paint | Pro Paint | Refacing (Pro) | Full Replacement |
|---|---|---|---|---|
| Materials (paint, primer, supplies) | $150-$400 | Included in labor | Included in labor | N/A |
| New door and drawer fronts | None | None | $800-$3,000+ | Included in cabinet cost |
| Veneer or laminate for box faces | None | None | $300-$900 | N/A |
| Labor | Your time | $800-$2,500 | $1,500-$4,500 | $3,000-$8,000+ |
| New cabinet boxes | None | None | None | $3,000-$15,000+ |
| Demolition and disposal | None | None | None | $500-$1,500 |
| Countertop removal/reinstall risk | Low | Low | Low | High |
| Permit likelihood | Rare | Rare | Rare | Common |
| Typical project duration | 3-7 days | 2-5 days | 3-7 days | 3-8 weeks |
| Estimated total range (avg. kitchen) | $200-$600 | $1,200-$3,500 | $3,000-$9,000 | $8,000-$25,000+ |
Ranges assume an average U.S. kitchen with 20-30 linear feet of cabinetry. Custom door styles, specialty veneers, and structural repairs will push costs toward the upper end.
The practical implication is straightforward: if your cabinet boxes are structurally sound and your layout works, refacing or professional painting delivers the visual impact of new cabinets at 30-60 cents on the dollar compared to full replacement. The closer your existing layout is to what you want, the stronger the case for updating rather than replacing.
The biggest hidden cost of full replacement is not the cabinets themselves, it is the cascade of related work: countertop removal, plumbing disconnection, tile repair, and the extended period without a functional kitchen. Refacing and painting avoid all of it.
When Full Replacement Actually Wins
Refacing and painting are not always the right answer. Full replacement makes more financial sense in three specific scenarios:
- Structural box failure. If cabinet boxes show water damage, delamination of the box panels, or compromised joints, applying new faces to a failing structure is money wasted. Press firmly on the bottom corners of lower cabinets and the top corners of uppers, soft spots indicate moisture damage.
- Layout change required. Refacing preserves the existing footprint exactly. If you need to move a cabinet, add an island, or change the configuration of the kitchen, replacement is the only path.
- Thermofoil delamination on the boxes. If the existing cabinet boxes are wrapped in thermofoil that is already peeling, veneer adhesion over the top is unreliable. In this case, replacement or a full strip-and-paint is more durable than refacing.
Durability and Maintenance Comparison
This is the section most guides skip, and it is where homeowners make expensive mistakes by choosing a method based on upfront cost alone without understanding the long-term maintenance picture.
Painted cabinets cured with a waterborne alkyd enamel are highly durable when properly prepared. The finish hardens over 21-30 days post-application. Once fully cured, a quality enamel surface can be wiped with a damp cloth and mild dish soap without damage. The vulnerability points are edges and areas around hardware, where repeated contact causes wear over years. Touch-up painting is straightforward, keep a small quantity of the original paint for spot repairs. Realistic lifespan before a full repaint is needed: 8-15 years depending on household use intensity.
Refaced cabinets with real wood door fronts and quality PVC or wood veneer on the box faces perform comparably to new mid-grade cabinets. The critical maintenance concern is edge and corner adhesion on the veneer. In kitchens with steam sources (dishwashers, stovetops without adequate ventilation), veneer edges are the first failure point. Inspect edges annually and re-adhere any lifting sections immediately with contact cement before moisture works behind the veneer. Realistic lifespan: 10-20 years with proper installation and maintenance.
Full replacement cabinets at the builder-grade price point frequently use particleboard boxes with thermofoil or melamine door fronts. Thermofoil is particularly vulnerable to heat, positioning a toaster oven or coffee maker directly below an upper cabinet can cause delamination within a few years. This is a case where "new" does not automatically mean "more durable" than a well-executed reface or repaint of solid wood originals.
| Maintenance Factor | DIY Paint | Pro Paint | Refacing | Full Replacement (Builder Grade) |
|---|---|---|---|---|
| Cleaning method | Damp cloth, mild soap | Damp cloth, mild soap | Damp cloth, mild soap | Damp cloth, mild soap |
| Humidity vulnerability | Low (if cured properly) | Low | Medium (veneer edges) | Medium-High (thermofoil) |
| Touch-up ease | Easy | Easy | Moderate | Difficult |
| Heat sensitivity | Low | Low | Low-Medium | High (thermofoil) |
| Expected lifespan | 8-15 years | 10-15 years | 10-20 years | 7-15 years |
Skipping surface preparation before refacing or painting is the leading cause of premature finish failure. Proper sanding, cleaning, and priming adds time but is non-negotiable for durability. A finish applied over a greasy or glossy surface will begin peeling at stress points, hinges, edges, and around hardware, within one to two years regardless of paint quality.
DIY Kitchen Cabinet Painting Tips That Actually Last
Painting kitchen cabinets is the most cost-effective way to transform their appearance, but the gap between a finish that lasts and one that peels within a year comes down almost entirely to preparation and product selection.
A homeowner carefully painting white cabinet doors laid flat on a drop cloth in a bright kitchen, with brushes, primer cans, and painter’s tape visible nearby.
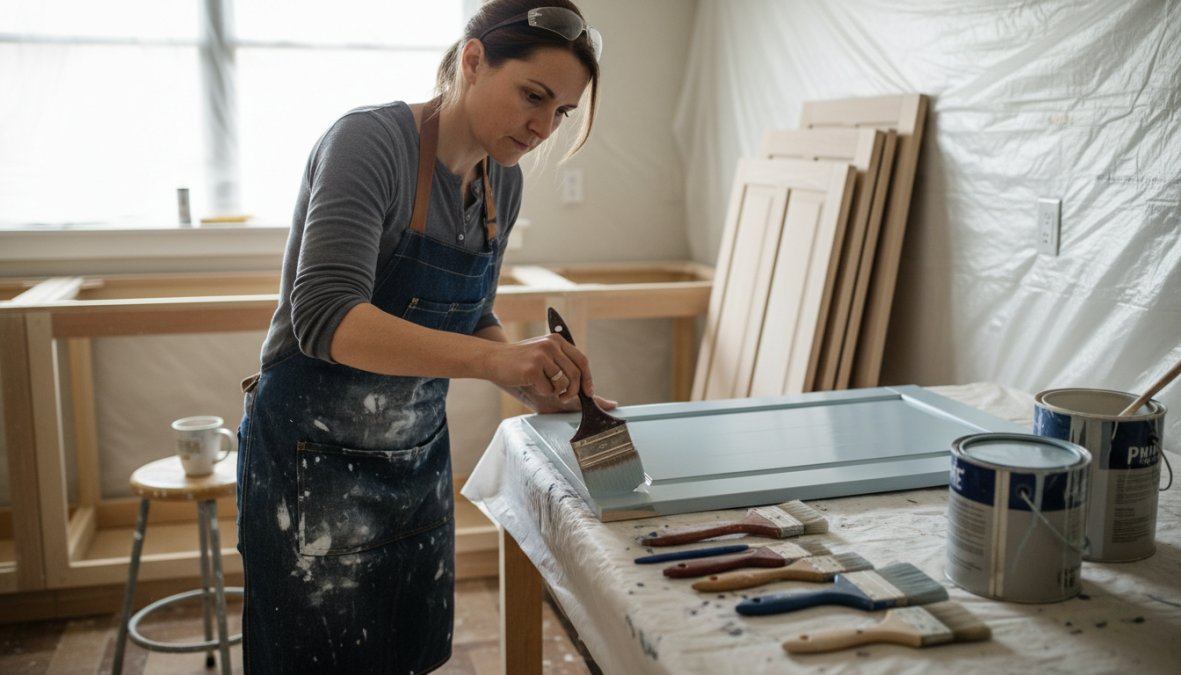
The single most important step most DIYers skip is removing the doors and drawer fronts before painting. Painting in place creates drips, brush marks at hinges, and uneven coverage. Laying doors flat on a drop cloth gives you control over the finish and allows gravity to work in your favor.
Choosing the Right Paint and Primer for Cabinet Surfaces
Cabinet surfaces are not wall surfaces. They need products formulated for hard-use, high-adhesion applications.
Primer selection: Use a bonding primer specifically rated for slick or previously finished surfaces. Oil-based primers provide superior adhesion on older cabinets with unknown finish history. Water-based bonding primers work well on already-stripped or sanded surfaces.
Paint selection: Alkyd or waterborne alkyd enamel paints are the professional standard for cabinet painting. They level well, cure to a hard film, and resist chipping far better than standard latex wall paint. Brands like Benjamin Moore Advance and Sherwin-Williams Emerald Urethane are commonly used by professionals for exactly this reason.
Color selection: Neutral colors and earthy tones have dominated kitchen design for several years running. A monochromatic color scheme with cabinet color matched to walls creates a cohesive, custom kitchen feel without any structural changes.
According to Benjamin Moore’s interior paint product specifications, waterborne alkyd formulas require a full cure period of up to 30 days before they reach maximum hardness. Handle freshly painted cabinets gently during this period.
Common Mistakes to Avoid When Painting Cabinets
The most common failures in DIY cabinet painting follow predictable patterns:
- Skipping the degreasing step. Kitchen cabinets accumulate grease that prevents paint adhesion. Clean every surface with a TSP substitute or degreaser before sanding.
- Sanding too lightly. The goal is to scuff the existing finish, not remove it entirely. Use 120-grit sandpaper followed by a tack cloth to remove dust.
- Using the wrong applicator. Foam rollers leave a slightly textured finish that looks fine on walls but shows on cabinet doors. A fine-finish foam roller or spray application produces a smoother result.
- Rushing recoats. Each coat needs adequate dry time. Applying a second coat too early traps solvents and causes wrinkling.
- Skipping a topcoat. A water-based polyurethane topcoat adds meaningful protection to painted cabinet surfaces, particularly around handles and edges.
How to Install Cabinet Vinyl Wrap for a Budget-Friendly Makeover
Cabinet vinyl wrap is a budget-friendly alternative to painting or refacing that has improved dramatically in quality over the past decade. Modern vinyl films designed for kitchen applications are heat-resistant, moisture-resistant, and available in finishes that convincingly mimic wood grain, stone, and solid color options.
The installation process requires patience and the right tools, but it’s accessible for most DIYers:
- Clean and degrease all cabinet surfaces thoroughly. Any residue will prevent adhesion.
- Remove doors and drawer fronts from the cabinet boxes.
- Sand lightly to remove any gloss from the existing finish.
- Measure and cut vinyl sections with a 2-inch overlap on all edges.
- Apply from the center outward, using a squeegee to push air bubbles toward the edges.
- Wrap edges using a heat gun on low to make the vinyl pliable around corners.
- Trim excess with a sharp utility knife and a straight edge.
- Reinstall doors and drawer fronts after allowing the adhesive to set for 24 hours.
As documented in 3M’s Di-Noc architectural finishes installation guide, proper surface temperature during application significantly affects adhesion quality. Work in a room temperature environment, not in a cold garage.
Troubleshooting Common Vinyl Wrap Failures
The most frequent vinyl wrap problems are preventable. Bubbling after installation usually means the surface wasn’t clean enough or the vinyl was applied too quickly without working out air systematically. Small bubbles can sometimes be removed by piercing with a pin and pressing flat.
Edge lifting is the other common failure point. Corners and edges are highest-stress areas. Use a heat gun to soften the vinyl during application and press firmly with a squeegee. A thin bead of vinyl-compatible adhesive applied to lifting edges can salvage an otherwise good installation.
Vinyl wrap performs best on flat door fronts. Raised panel doors with complex profiles are significantly harder to wrap cleanly and are better candidates for painting or replacement.
Score the vinyl at inside corners with a razor blade rather than trying to stretch it around the corner. Clean cuts at corners look far more professional than stretched, wrinkled vinyl.
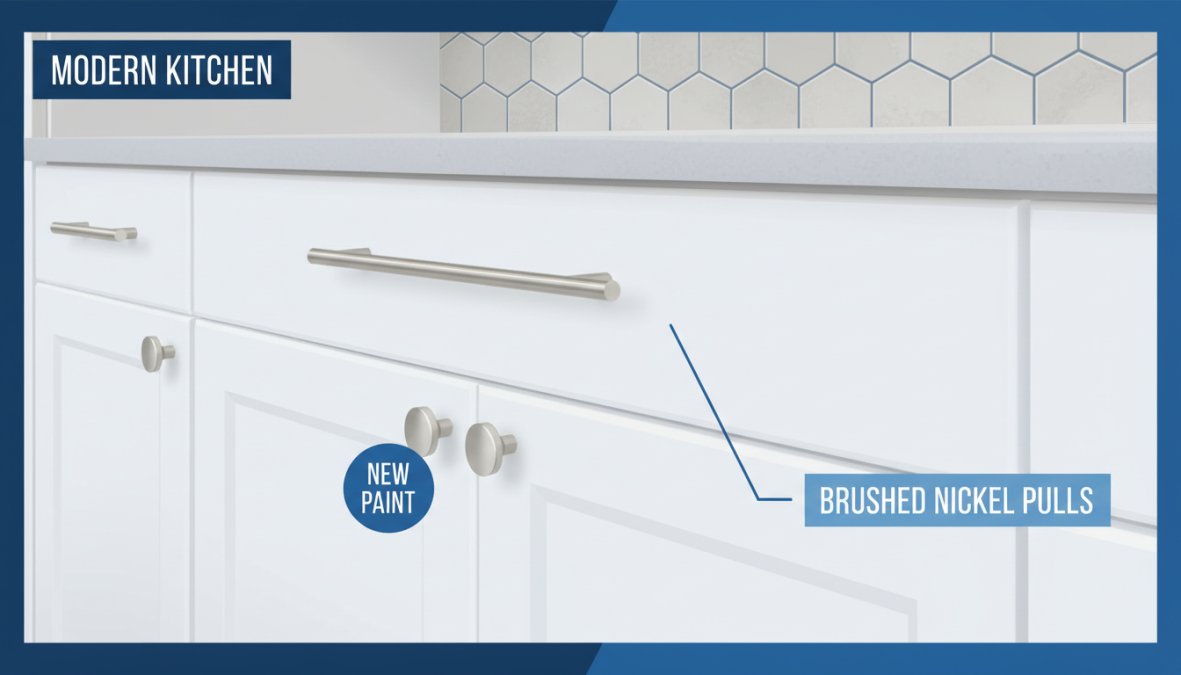
Best Cabinet Hardware for Modern Kitchens
Hardware is the fastest and cheapest cabinet update available, and its visual impact is routinely underestimated. Swapping builder-grade knobs for modern pulls can visually modernize an entire kitchen in an afternoon for a fraction of the cost of any other method on this list. For an average kitchen with 20-30 cabinet doors and 10-15 drawers, a full hardware replacement typically runs $150-$600 in materials depending on the finish and style selected, making it the highest-ROI-per-dollar update covered in this guide.
Choosing the Right Finish and Style
The current dominant trends in cabinet hardware lean toward bar pulls in brushed finishes. Brushed nickel, brushed brass, and matte black are the three finishes that appear most consistently in contemporary kitchen design. Chrome is fading from kitchens. Ornate, decorative hardware looks increasingly dated against the clean lines of modern cabinet styles.
Finish selection should also account for maintenance reality, not just aesthetics:
- Matte black hides fingerprints well but shows water spots in kitchens with hard water. Wipe dry after contact with water.
- Brushed nickel is the most forgiving finish for daily use, fingerprints and minor water marks are nearly invisible.
- Brushed brass and unlacquered brass develop a patina over time. Some homeowners find this desirable; others do not. Lacquered brass maintains its finish longer but can chip at edges.
- Polished chrome and polished nickel show every fingerprint and require frequent wiping to look clean in a working kitchen.
Knobs vs. Pulls: A Functional Decision, Not Just Aesthetic
Most guides treat knob vs. pull selection as purely a style choice. It is also a functional one.
Pulls (bar pulls, cup pulls, bin pulls) are easier to grip with wet or full hands, which matters in a working kitchen. They distribute grip force across a wider area, reducing stress on the door face over time. Bar pulls are the current standard for drawers of any size.
Knobs work well on cabinet doors where a single-point grip is sufficient, you are swinging a door open, not pulling against drawer friction. Knobs are harder to grip with wet hands and are not recommended as the sole hardware on heavy drawers.
A common and well-regarded approach: knobs on upper cabinet doors, bar pulls on lower cabinet doors and all drawers. This creates visual consistency while optimizing function by location.
Selecting the Right Size
- Small drawers (under 12 inches wide): 3- to 4-inch bar pulls or a single knob
- Medium drawers (12-24 inches wide): 4- to 6-inch bar pulls
- Large drawers (over 24 inches wide): 8- to 12-inch bar pulls; consider two knobs for very wide drawers
- Upper cabinet doors: Single knob or 3- to 4-inch pull placed in the lower corner of the door (upper corner for lower cabinet doors)
- Oversized pulls on upper doors: A current design trend, a 6- to 8-inch pull centered horizontally on an upper cabinet door creates a custom, furniture-like appearance
According to National Kitchen and Bath Association design guidelines, hardware placement consistency across all doors and drawers is one of the details that most influences the perceived quality and intentionality of a kitchen design.
Practical Installation Notes
Use a hardware template jig. This is non-negotiable for a professional result. A single misaligned pull throws off the visual rhythm of the entire cabinet run. Template jigs are available at hardware stores for under $15 and eliminate measurement error across dozens of doors.
Pre-drill all holes before mounting to prevent face splitting, particularly on MDF or plywood door faces. Use a sharp brad-point bit sized to the hardware screw diameter.
Match screw length to door thickness. Most cabinet doors are 3/4 inch thick. Standard hardware screws packaged with pulls are often 1 inch or longer and will protrude through thin doors. Measure your door thickness before ordering hardware, and purchase appropriately sized machine screws (typically 8-32 thread) separately if needed.
Troubleshooting: When New Hardware Holes Don’t Align with Old Ones
This is the most common hardware installation problem and the one no competitor guide addresses. If you are replacing existing hardware, the new pull’s hole spacing may not match the old holes, especially if you are switching from knobs (single hole) to bar pulls (two holes) or changing the center-to-center spacing.
Scenario 1: Old single knob hole, new bar pull with two holes.
The old hole will fall between the two new holes if you center the pull on the door. In most cases, the old hole is concealed behind the pull’s backplate or body. Measure carefully before ordering, many bar pulls have a backplate wide enough to cover a 1-inch-diameter legacy hole. If not, a pull with a decorative backplate (sold separately or as a set) will cover the gap cleanly.
Scenario 2: New hole spacing doesn’t match old hole spacing.
If switching from 3-inch center-to-center pulls to 4-inch pulls, the old holes will be exposed. Options:
- Fill old holes with a color-matched wood filler, sand flush, touch up with cabinet paint, and drill new holes. This is the cleanest solution on painted cabinets.
- On stained or natural wood doors, use a grain-matched wood plug (available at woodworking suppliers) glued into the old hole, sanded flush, and finished to match.
- Select new hardware with a backplate that covers the old hole pattern, many traditional and transitional style pulls include backplates for exactly this reason.
Scenario 3: Hole drilled in wrong location.
If a new hole is drilled off-center or in the wrong position, fill it with wood filler rated for paintable surfaces, allow full cure time (typically 24 hours), sand flush, prime, and touch up before drilling the correct location. On painted cabinet faces, this repair is nearly invisible when done carefully.
Before drilling any new holes, apply a strip of painter’s tape over the drill location. The tape reduces tear-out on the face of the door and gives you a surface to mark your center point clearly. Remove the tape after drilling.
Total Cost Reality Check
A full hardware upgrade for an average kitchen (30 pieces of hardware) at mid-range pricing runs approximately:
- Budget tier (basic bar pulls, brushed nickel): $3-$6 per piece → $90-$180 total
- Mid-range tier (solid brass or stainless bar pulls): $8-$18 per piece → $240-$540 total
- Designer tier (unlacquered brass, artisan pulls): $25-$60+ per piece → $750-$1,800+ total
The mid-range tier represents the best value for most homeowners, the quality difference between a $12 brushed nickel pull and a $45 designer pull is largely aesthetic, not functional. The quality difference between a $4 pull and a $12 pull, however, is often substantial in terms of finish durability and mechanical feel.
More Ways of Transforming Kitchen Cabinets Without a Full Remodel
The methods above cover the highest-impact options. These additional approaches round out a complete kitchen makeover strategy and can be combined with painting or refacing for a comprehensive transformation.
Adding Crown Molding and Cabinet Trim
Crown molding bridges the gap between cabinet tops and the ceiling, creating a built-in, custom kitchen appearance. Builder-grade cabinets almost never include crown molding. Adding it changes the visual weight of the entire room.
Cabinet trim, including light rail molding along the bottom of upper cabinets and base molding on lower units, adds the same architectural detail that distinguishes custom cabinetry from stock. Installation requires basic carpentry skills, a miter saw, and finish nails. The materials cost is low relative to the impact.
Paint the molding to match the cabinet color for a seamless look, or use a contrasting color for a two-tone effect that’s currently popular in kitchen interior design.
Replacing Cabinet Doors and Drawer Fronts
Cabinet redooring is the most impactful single change you can make without touching the cabinet boxes. New doors and drawer fronts in a different style can shift a kitchen from traditional to contemporary, or from dated to clean and modern.
Many manufacturers sell replacement cabinet doors cut to order. Measure existing doors precisely, order replacements in your chosen style and species, and finish them to match or contrast your existing boxes. This approach works best when the cabinet boxes themselves are in good condition and the existing layout functions well.
Open Shelving Conversions and Glass Door Inserts
Removing upper cabinet doors entirely to create open shelving is a dramatic, low-cost transformation. Open shelving creates visual lightness in kitchens that feel heavy or closed in. The trade-off is that everything on the shelves is visible, which requires intentional organization.
Glass door inserts are a middle-ground option. Removing the center panel from existing cabinet doors and replacing it with glass preserves storage while creating visual depth. Frosted glass maintains privacy while still breaking up the visual mass of solid doors. Clear glass works best for displaying curated dishware in a custom kitchen setting.
Eco-Friendly and Sustainable Cabinet Update Options
Sustainability is an increasingly relevant consideration for homeowners undertaking kitchen makeovers. The most eco-friendly approach to cabinet updating is refinishing what you already have, which eliminates the manufacturing and disposal footprint of new cabinets entirely.
For paint selection, low-VOC and zero-VOC waterborne alkyd formulas are now widely available and perform comparably to traditional oil-based products. These reduce indoor air quality impact during and after application.
For hardware, consider manufacturers who use recycled metals or offer take-back programs. Brushed finishes often use less coating material than polished options, which is a minor but real environmental consideration.
Vinyl wrap involves plastic materials with a limited lifespan. If sustainability is a priority, painting or wood veneer refacing are better long-term choices. Wood veneer from FSC-certified sources is available from most major millwork suppliers.Cabinet Painting Denver, Cabinet Refinishing Denver, Cabinet Refinishing Golden co, Cabinet Glazing Denver, painting kitchen cabinets Denver, Kitchen cabinet painting Denver, cabinet restoration Denver, cabinet painting services Denver, cabinet painting company Denver, Cabinet painter Denver, Parker co, Highlands Ranch co, castle rock co, castle pines co, Littleton co, Ken Caryl co, Roxborough Park co, Bloomfield co, Lakewood co, Westminster co, Thornton co, Brighton co,
As outlined in EPA’s Safer Choice program for interior coatings, selecting paints and primers with Safer Choice certification reduces exposure to harmful chemicals during kitchen renovation projects.
Updating a kitchen feels overwhelming when full replacement is the only option on the table. Denver Cabinet Painting Colorado specializes in exactly these targeted transformations, bringing 40 years of experience in cabinet painting, refinishing, and glazing to residential and commercial kitchens across the Denver metro area and throughout Colorado. Their team prioritizes meticulous surface preparation and professional application to deliver smooth, consistent finishes that last. Get a free quote from Denver Cabinet Painting Colorado and find out what your kitchen can look like without the cost or disruption of a full remodel.
Frequently Asked Questions
What is the cheapest way to update kitchen cabinets?
Painting your existing cabinets is generally the most budget-friendly approach to transforming kitchen cabinets without a full remodel. A DIY paint job can cost a few hundred dollars in materials, while professional cabinet painting typically costs a fraction of full replacement. Upgrading cabinet hardware is another low-cost option that delivers a noticeable visual impact. Combining a fresh coat of paint with new pulls and knobs can modernize an outdated kitchen for well under $1,000 in many cases.
Is it worth refacing kitchen cabinets vs replacing them?
Cabinet refacing is generally worth it when your cabinet boxes are structurally sound and your kitchen layout works well for you. Refacing replaces only the doors, drawer fronts, and visible surfaces, which typically costs significantly less than full cabinet replacement. It also produces far less waste, making it a more sustainable choice. However, if your cabinets are damaged, warped, or you want a completely new kitchen layout, replacement may be the better long-term investment.
Can you change the look of kitchen cabinets without painting them?
Yes. There are several ways to update cabinets without paint, including cabinet vinyl wrap installation, replacing door and drawer fronts through cabinet redooring, adding glass inserts to existing doors, converting upper cabinets to open shelving, upgrading to modern hardware, or adding crown molding and decorative trim. Each method can dramatically improve aesthetic appeal and modernize an outdated kitchen without a brush or roller in sight.
How long do cabinet transformations usually last?
Durability varies by method. Professionally applied cabinet paint with proper preparation and a quality topcoat can last 10 or more years with routine cleaning. Cabinet vinyl wrap typically lasts 5 to 7 years depending on humidity and usage. New cabinet doors and drawer fronts, if made from quality materials, can last as long as original cabinetry. Hardware upgrades are essentially permanent. Proper surface prep is the single biggest factor in how long any cabinet transformation holds up.
Cabinet Painting Service Areas in Denver & Surrounding Cities, Cabinet Refinishing in Denver County,
Serving Lakewood, CO, Littleton, CO, Golden, CO, Evergreen CO, Roxborough Park CO, Ken Carl Ranch CO,
Arvada, CO, Wheat Ridge, CO,
and Parker CO. Castle Pines CO. Englewood CO. Centennial CO.
Cabinet Painting in Arapahoe County, CO
Including Centennial, CO, Greenwood Village, CO,
Cherry Hills Village, CO, Englewood, CO,
and Aurora, CO.
Cabinet Painting in Adams County & Broomfield, CO
What are the best DIY kitchen cabinet painting tips for a lasting finish?
For lasting results when painting kitchen cabinets, thorough preparation is critical. Remove all doors, drawer fronts, and hardware before starting. Clean surfaces with a degreaser to remove grease and grime. Sand lightly to improve adhesion, then apply a bonding primer before your topcoat. Use a cabinet-specific paint in a satin or semi-gloss finish for durability. Apply thin, even coats and allow full drying time between coats. Skipping prep steps is the most common reason DIY cabinet paint jobs fail prematurely.
This article was written using GrandRanker

