Table of Contents
- What Is a Factory Finish and Why It Matters for Cabinets
- How to Prep Cabinets for Painting: Surface Preparation Essentials
- Best Paint Sprayer for Cabinets: Equipment Selection
- Creating the Ideal Environment: Temperature, Humidity, and Dust Control
- Step-by-Step: How to Get a Factory Finish on Cabinets
- How Long Does It Take to Paint Cabinets: Timeline Expectations
- Cabinet Painting Mistakes to Avoid for Professional Results
- Conclusion: Achieving Professional Cabinet Refinishing Results
Last Updated: July 6, 2026
What Is a Factory Finish and Why It Matters for Cabinets
A factory finish is a multi-layer coating system applied under controlled conditions that produces a smooth, durable, glass-like surface impossible to achieve with brush or roller application. Factory finishes use catalyzed polyurethane or conversion varnish systems that harden through chemical reaction rather than simple evaporation, creating a finish that resists scratches, water damage, and daily wear far better than latex or acrylic paints.
Your kitchen cabinets face daily abuse, moisture from cooking, heat fluctuations, grease splatter, and constant contact with hands and objects. Standard paint fails in this environment within 2-3 years. A proper factory finish lasts 10-15 years or longer with minimal maintenance.
Why Factory Finishes Are Superior to Standard Paint
Standard latex paint dries through water evaporation, making it vulnerable to moisture and temperature swings. Catalyzed polyurethane finishes cure through a chemical reaction between resin and hardener, creating a molecular bond that’s fundamentally harder and more resistant.
Factory finishes are sprayed, depositing paint in microscopically thin, overlapping layers that self-level into a perfectly smooth surface with no brush marks or texture. Standard paint on cabinets typically shows wear within 18-24 months, while proper factory finishes maintain their appearance for 10+ years.
Catalyzed Polyurethane vs. Standard Paint: The Key Difference
Standard paint contains pigment suspended in water or solvent. When the solvent evaporates, the finish can soften if exposed to moisture or solvents again. Catalyzed polyurethane mixes a polyol resin with an isocyanate hardener, undergoing a chemical cross-linking reaction that creates a thermoset plastic. Once cured, this finish cannot be softened or dissolved, it’s chemically bonded to the substrate and resistant to solvents, water, and UV damage.
For kitchen and bathroom cabinets facing moisture, heat, and constant contact, catalyzed polyurethane is required. Two-part catalyzed systems also cure faster than single-component finishes, allowing cabinets to return to service in days rather than weeks.
How to Prep Cabinets for Painting: Surface Preparation Essentials
Surface preparation determines whether a factory finish succeeds or fails. Professionals spend 40-60% of their time on preparation, not application. Cabinet doors and drawer fronts must be stripped to bare wood or existing finish must be completely sanded smooth.
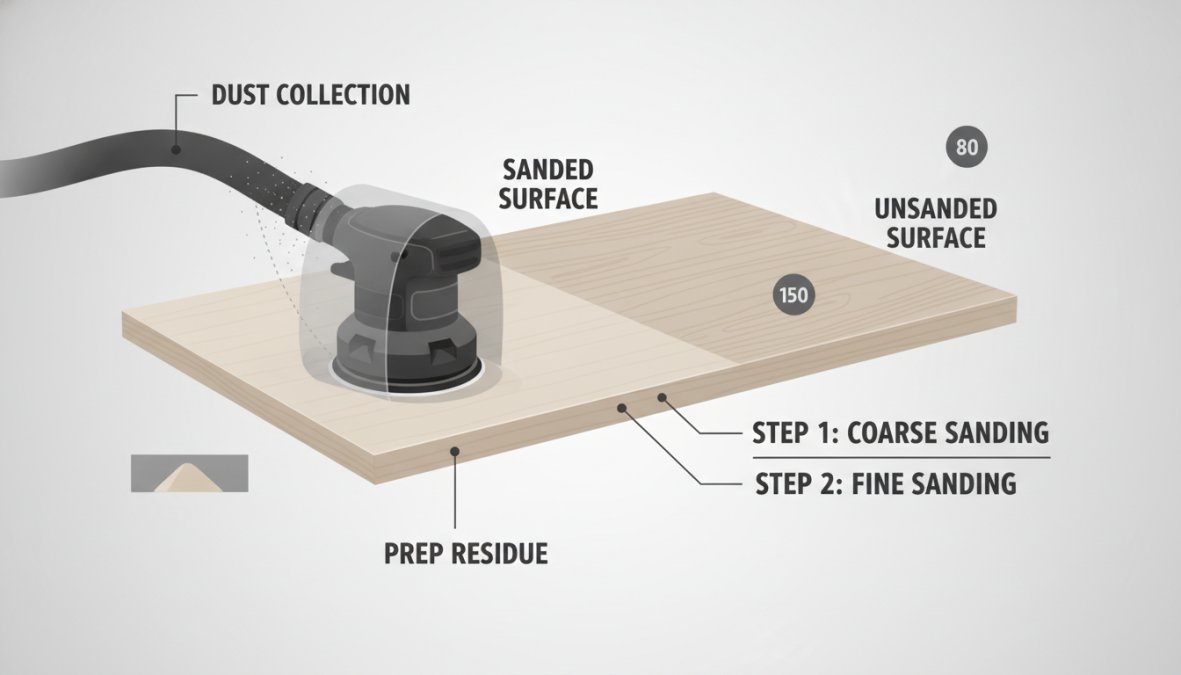
Remove all cabinet doors and hardware, labeling each door for reassembly. Sand the entire surface with 150-grit paper to break the gloss, then follow with 220-grit to create a smooth substrate. The goal is to create a surface that accepts primer.
Skipping proper sanding is the single most common reason factory finishes fail. Paint applied over glossy surfaces will peel within months. Budget 8-12 hours for thorough sanding of a standard kitchen’s worth of cabinets.
Sanding Grit Selection and Technique
Start with 120-grit if the finish is heavily damaged or chipped. Move to 150-grit for general smoothing, then finish with 220-grit or higher. Use an orbital sander for flat surfaces and a detail sander for edges and crevices, hand-sanding areas the power sander cannot reach.
After sanding, remove all fine dust with a tack cloth, a sticky cloth that picks up dust without leaving residue. Wipe down all surfaces, then let dust settle for 15-20 minutes before priming.
Degreasing and Tack Cloth Application
Kitchen cabinets accumulate grease and cooking residue that prevents primer adhesion. After sanding, wipe all surfaces with a degreaser or TSP (trisodium phosphate) solution. Mix TSP according to package directions, typically one tablespoon per gallon of warm water. Pay special attention to areas near the stove where grease accumulation is heaviest. Allow surfaces to dry completely, at least 4 hours, before moving to the next step.
Use a tack cloth immediately before priming to capture any remaining dust particles.
Best Paint Sprayer for Cabinets: Equipment Selection
The sprayer you choose determines whether you can achieve a factory finish. Brush or roller application will never produce results comparable to spray equipment. Two main types work for cabinet finishing: HVLP (high-volume low-pressure) systems and airless sprayers.

HVLP systems use high air volume at low pressure to atomize paint, creating a soft spray pattern with minimal overspray and excellent control. Airless sprayers use hydraulic pressure to force paint through a tiny opening, creating a fine mist.
HVLP Spray Systems vs. Airless Sprayers
HVLP systems are ideal for DIY and small professional work. They produce minimal overspray, reducing paint waste and cleanup. The spray pattern is soft and controllable, making it easier to avoid runs and sags. The downside is slower application, a full kitchen takes 12-16 hours of spraying time.
Airless sprayers deliver paint much faster, allowing professionals to spray a kitchen in 4-6 hours. However, they produce more overspray, waste more paint, and require more skill to operate without creating runs. They’re also more expensive.
For DIY cabinet finishing, HVLP is the better choice. The slower application rate forces precision, and reduced overspray means less waste and cleanup.
Equipment Rental vs. Purchase: Cost-Benefit Analysis
A decent HVLP system costs $300-800 new. HVLP rental typically costs $40-60 per day. If you’re painting one kitchen, rental makes sense. However, if you plan to refinish multiple pieces or tackle additional cabinet projects, purchase becomes economical after 5-10 rental days.
Rent before you buy. Spend a day with rental equipment on a less-visible project to determine whether you enjoy the process and want to invest in equipment.
Creating the Ideal Environment: Temperature, Humidity, and Dust Control
Catalyzed polyurethane finishes are sensitive to environmental conditions. Ideal conditions are 65-75°F with 40-60% relative humidity. Temperature below 55°F significantly slows curing. Above 85°F, the finish can cure so quickly that it doesn’t self-level, leaving visible texture. Humidity below 30% causes the finish to cure too quickly and can create adhesion problems. Humidity above 80% slows curing and can trap moisture, causing clouding.
Dust-Free Environment Setup
Dust is the enemy of factory finishes. Designate a room for cabinet finishing and seal it. Close windows and doors, cover air vents with plastic sheeting and tape, and turn off HVAC systems during spraying. Vacuum the room thoroughly with a HEPA-filter vacuum, then let dust settle for 30 minutes before beginning.
Wear a respirator rated for organic vapors when spraying catalyzed finishes. These finishes release isocyanates during application, which are hazardous if inhaled. A simple dust mask is insufficient.
Lay plastic sheeting on the floor to contain drips and overspray. The goal is a completely sealed, dust-free environment.
Step-by-Step: How to Get a Factory Finish on Cabinets
Step 1: Prime with Quality Bonding Primer
After sanding, degreasing, and tack-cloth wiping, apply a bonding primer specifically formulated for cabinets. Hold the spray gun 8-10 inches from the surface, moving at a steady pace with 50% overlap on each pass. One coat is typically sufficient. Primer should dry to touch in 1-2 hours and be ready for topcoat in 4-8 hours.
Step 2: Apply Catalyzed Polyurethane Base Coat
Mix the polyurethane according to the manufacturer’s ratio, typically 4 parts resin to 1 part hardener by volume. Use a calibrated measuring cup. After mixing, let the material sit for 15-20 minutes to allow air bubbles to escape.
Spray the first coat using the same technique as primer: 8-10 inches from the surface, 50% overlap, steady pace. Apply thin, even coats rather than one heavy coat. Open dry time is typically 2-4 hours, but the finish continues to cure for 24-48 hours. Do not reassemble cabinets until full cure time has passed.
Step 3: De-Nibbing Between Coats
After the first coat dries, inspect the surface for tiny dust particles or imperfections. Use 320-grit or 400-grit sandpaper to lightly sand the entire surface, removing only imperfections, not the finish itself. Wipe with a tack cloth and let dust settle for 15-20 minutes before applying the next coat.
Step 4: Apply Self-Leveling Top Coat with Hardener
The final coat is typically a self-leveling polyurethane formulated to flow out and create a perfectly smooth surface. Mix using the same ratio and induction time as the base coat. Apply with slightly slower passes to allow the material to flow and self-level.
The self-leveling top coat transforms the appearance from acceptable to exceptional. Don’t skimp on quality or application technique here.
Step 5: Curing Time and Open Dry Time Management
Maintain the dust-free environment during the entire curing period. Keep the room sealed and undisturbed. Do not turn on HVAC systems or open windows. Full cure time varies by temperature and humidity. At 65-75°F with 50% humidity, expect 24 hours for initial cure and 48 hours before cabinets can be used normally. In cooler conditions, add 12-24 hours to these times.
How Long Does It Take to Paint Cabinets: Timeline Expectations
Day 1: Remove cabinet doors and hardware, sand all surfaces (8-12 hours).
Day 2: Degrease surfaces, apply tack cloth, prime (3-4 hours). Allow primer to cure 4-8 hours.
Day 3: Apply first coat of polyurethane, allow to dry 2-4 hours, de-nib, apply second coat (4-6 hours total). Allow to cure overnight.
Day 4: De-nib if necessary, apply self-leveling top coat (2-3 hours). Allow to cure 24-48 hours before reassembly.
Days 5-6: Reassemble cabinet doors and hardware once full cure is achieved.
The actual spraying time is 8-12 hours for a typical kitchen. Total calendar time is 5-7 days including cure times.
Cabinet Painting Mistakes to Avoid for Professional Results
Common Application Errors: Orange Peel and Brush Marks
Orange peel texture appears when spray pressure is too high or the gun is held too far from the surface. Adjust spray pressure downward and move closer to the surface, 8-10 inches is ideal.
Brush marks appear when using brush application instead of spray. Spraying is non-negotiable for factory finishes. Runs and sags occur when too much material is applied in one pass. Apply multiple thin coats rather than one heavy coat.
Safety Protocols for Catalyzed Finishes
Catalyzed polyurethane finishes release isocyanates during application and curing. Always wear a cartridge respirator rated for organic vapors and isocyanates. Replace cartridges after 40 hours of use or if you smell odors through the mask.
Wear gloves and protective clothing. Work in a well-ventilated space or outdoors if possible. Allow adequate ventilation during cure time as well, keep windows open and maintain air circulation for at least 24 hours after application.
Troubleshooting Guide: Fixing Common Finish Problems
| Problem | Cause | Fix |
|---|---|---|
| Dust nibs visible in finish | Dust settled during spraying | Sand with 320-grit, apply additional coat |
| Orange peel texture | Spray pressure too high or gun too far | Reduce pressure, move closer, apply thin coats |
| Runs or sags | Too much material applied | Apply thinner coats, use lower flow rate |
| Soft or sticky finish after 48 hours | Incorrect hardener ratio | Ensure 4:1 resin to hardener ratio by volume |
| Poor adhesion, peeling finish | Primer not applied or surface not sanded | Sand existing finish, apply bonding primer |
| Cloudy or milky appearance | High humidity during cure | Reduce humidity below 80%, extend cure time |
| Brush marks visible | Brush application instead of spray | Always use spray equipment for factory finishes |
Most issues can be corrected by sanding with 220-grit, de-nibbing, and applying a fresh coat.
Achieving a factory finish on your cabinets is absolutely possible as a DIY project, but it demands precision, patience, and proper equipment. Most failures stem from rushing preparation or skipping environmental controls, not from application technique. If you prefer professional results without the learning curve, Denver Cabinet Painting Colorado brings 40 years of expertise to cabinet finishing, handling surface preparation meticulously and applying catalyzed finishes that last 10+ years.
Frequently Asked Questions
What kind of paint gives the best factory finish on cabinets?
Catalyzed polyurethane (two-part paint) delivers the best factory finish on cabinets because it self-levels, cures hard, and resists yellowing. Unlike standard lacquer or water-based paints, catalyzed polyurethane requires a hardener mixed at application and produces a smooth, durable finish comparable to commercial cabinet manufacturing. Apply it with an HVLP spray system for optimal results.
Do I need to spray or brush cabinets for a factory finish?
Spraying is essential for a factory finish on cabinets. Brushing leaves visible brush marks and texture inconsistencies. An HVLP spray system or airless sprayer applies catalyzed polyurethane evenly, allowing the paint to self-level and cure with a smooth, professional appearance. Professional cabinet refinishing always uses spray application, not hand brushing.
How do you get a smooth finish on cabinets without brush marks?
Use a spray system (HVLP preferred for DIY) combined with proper surface preparation and self-leveling top coats. Sand between coats with fine-grit sandpaper, apply a bonding primer, use catalyzed polyurethane with hardener, and de-nib between applications. Maintain dust-free conditions and correct temperature/humidity (65-75°F, 40-50% humidity) to prevent orange peel texture and ensure smooth, consistent results.
Is it possible to get a factory finish on cabinets by hand without professional equipment?
A true factory finish requires spray application; hand-brushing cannot replicate that result. However, you can rent professional spray equipment (HVLP or airless sprayer) affordably to achieve near-factory quality. Equipment rental typically costs $40-$100 per day, far less than hiring professionals. Proper prep, catalyzed polyurethane, and technique matter more than owning equipment.
What is the best primer for a factory-like cabinet finish?
Use a bonding primer designed for glossy surfaces and cabinet refinishing. Bonding primers adhere well to existing finishes, sand smoothly, and provide excellent base for catalyzed polyurethane top coats. Avoid water-based primers on cabinet doors and drawer fronts; solvent-based bonding primers offer superior adhesion and durability for cabinets requiring a factory-quality finish.
This article was written using GrandRanker